

Article
Setting up a git-based workflow
Create models, questions, and dashboards in a staging Metabase, commit your changes to a repository, and push those changes to your production Metabase.
- First, set up your staging Metabase
- Create your Metabase application database for your staging Metabase
- Your staging and production databases must share the same display name, database engine, and schema
- Define which collections to check into version control
- Things to avoid in your staging environment
- Set up your Git repo and CI (your workflows)
- There are two basic staging-to-production setups
- Metabase staging-to-production setup with sync ON
- Metabase staging-to-production setup with sync OFF
- Make sure you’ve turned off sync
- Set up multiple staging environments with a config file
- Export the table metadata from your production Metabase
- Import content from your production Metabase to your staging Metabase(s)
- Develop your content in your staging Metabase(s)
- Export the changes you made in your staging Metabase to your production Metabase
- Example workflow YAML files for sync off setup
Serialization is only available on Pro and Enterprise plans (only on self-hosted plans).
This article will cover how to use Metabase’s serialization feature to keep staging and production Metabases in sync.
With this setup, you can fine-tune your questions, models, and dashboards in your staging Metabase. Then, when you’re satisfied with your work, you can commit those changes to a git repo, and push those changes to your production Metabase.
First, set up your staging Metabase
This setup only applies to self-hosted Metabases, both for staging and production.
We’re assuming you already have a production Metabase in play, and that you want to set up another Metabase to stage the development of questions, models, and dashboards.
Set up your staging Metabase on a server, either on your on-prem servers, or with your preferred cloud provider. The staging Metabase must be the same version as your production Metabase. Each time you upgrade your production Metabase, remember to upgrade your staging Metabase as well.
Create your Metabase application database for your staging Metabase
You’ll also need to set up a separate application database for each additional Metabase that you want to use for staging. Use PostgreSQL to store all of your models, questions, collections, and so on. (Or MySQL, if that’s what your production Metabase uses).
Your staging and production databases must share the same display name, database engine, and schema
To repeat, your staging and production databases must:
- Be the same type/engine. For example, if one is Postgres, the other must also be Postgres. The same version is ideal, but usually not important.
- Have the same schema.
- Have the same display name in Metabase (the Display name field when filling out your database connection details, not the database name itself).
Once you enter your connection information, you’ll need to wait until Metabase finishes syncing.
Define which collections to check into version control
You can serialize all collections, or (preferably) specify a subset of those collections. The idea is to be deliberate about which collections you include. It can be handy to have collections for experimentation in your staging Metabase that you can exclude from production.
If you only specify a few collections, we recommend that you mark those as official collections.
Things to avoid in your staging environment
- Avoid dashboard subscriptions and alerts. These items are specific to people’s accounts, and therefore Metabase excludes them from serialization.
- Avoid model caching in your staging Metabase, as model caching will conflict with your production Metabase.
Set up your Git repo and CI (your workflows)
Once you have your staging and production Metabases up and running, you need to create a repo to store your serialized Metabase content, which Metabase will export as a set of YAML files.
For this article, we’ll be using Github Actions to automate the pulling and pushing of that serialized data between staging and production Metabases. Your CI tool (in this case GitHub Actions) must have read/write access to this application database.
You’ll also add one or more GitHub Actions workflow YAML files to automate the serialization process. Optionally, you can turn on branch protection to require PR approvals before merging to your main branch.
There are two basic staging-to-production setups
The setups are:
- Staging Metabase with sync on
- Staging Metabase(s) with sync off
By default, Metabase runs some queries in the background to provide you with metadata:
- Syncs get updated schemas.
- Scans take samples of column values to populate filter dropdown menus.
- Fingerprinting samples additional column values to help with smart behavior, such as auto-binning for bar charts.
If these scheduled queries put too much strain on your database (usually only the case if your data warehouse is massive), you can turn them off. For more on how Metabase updates metadata, check out our docs.
When to use the setup with sync ON
- You have a single staging Metabase.
- Your connected data source is small.
- The data flow is unidirectional, from development to production (that is, you don’t need to pull metadata or content from production).
When to use the setup with sync OFF
- You have (or want to have) multiple development Metabases.
- Your underlying data source is large.
- Data flow is bidirectional: one or more staging Metabases push and pull to one production Metabase.
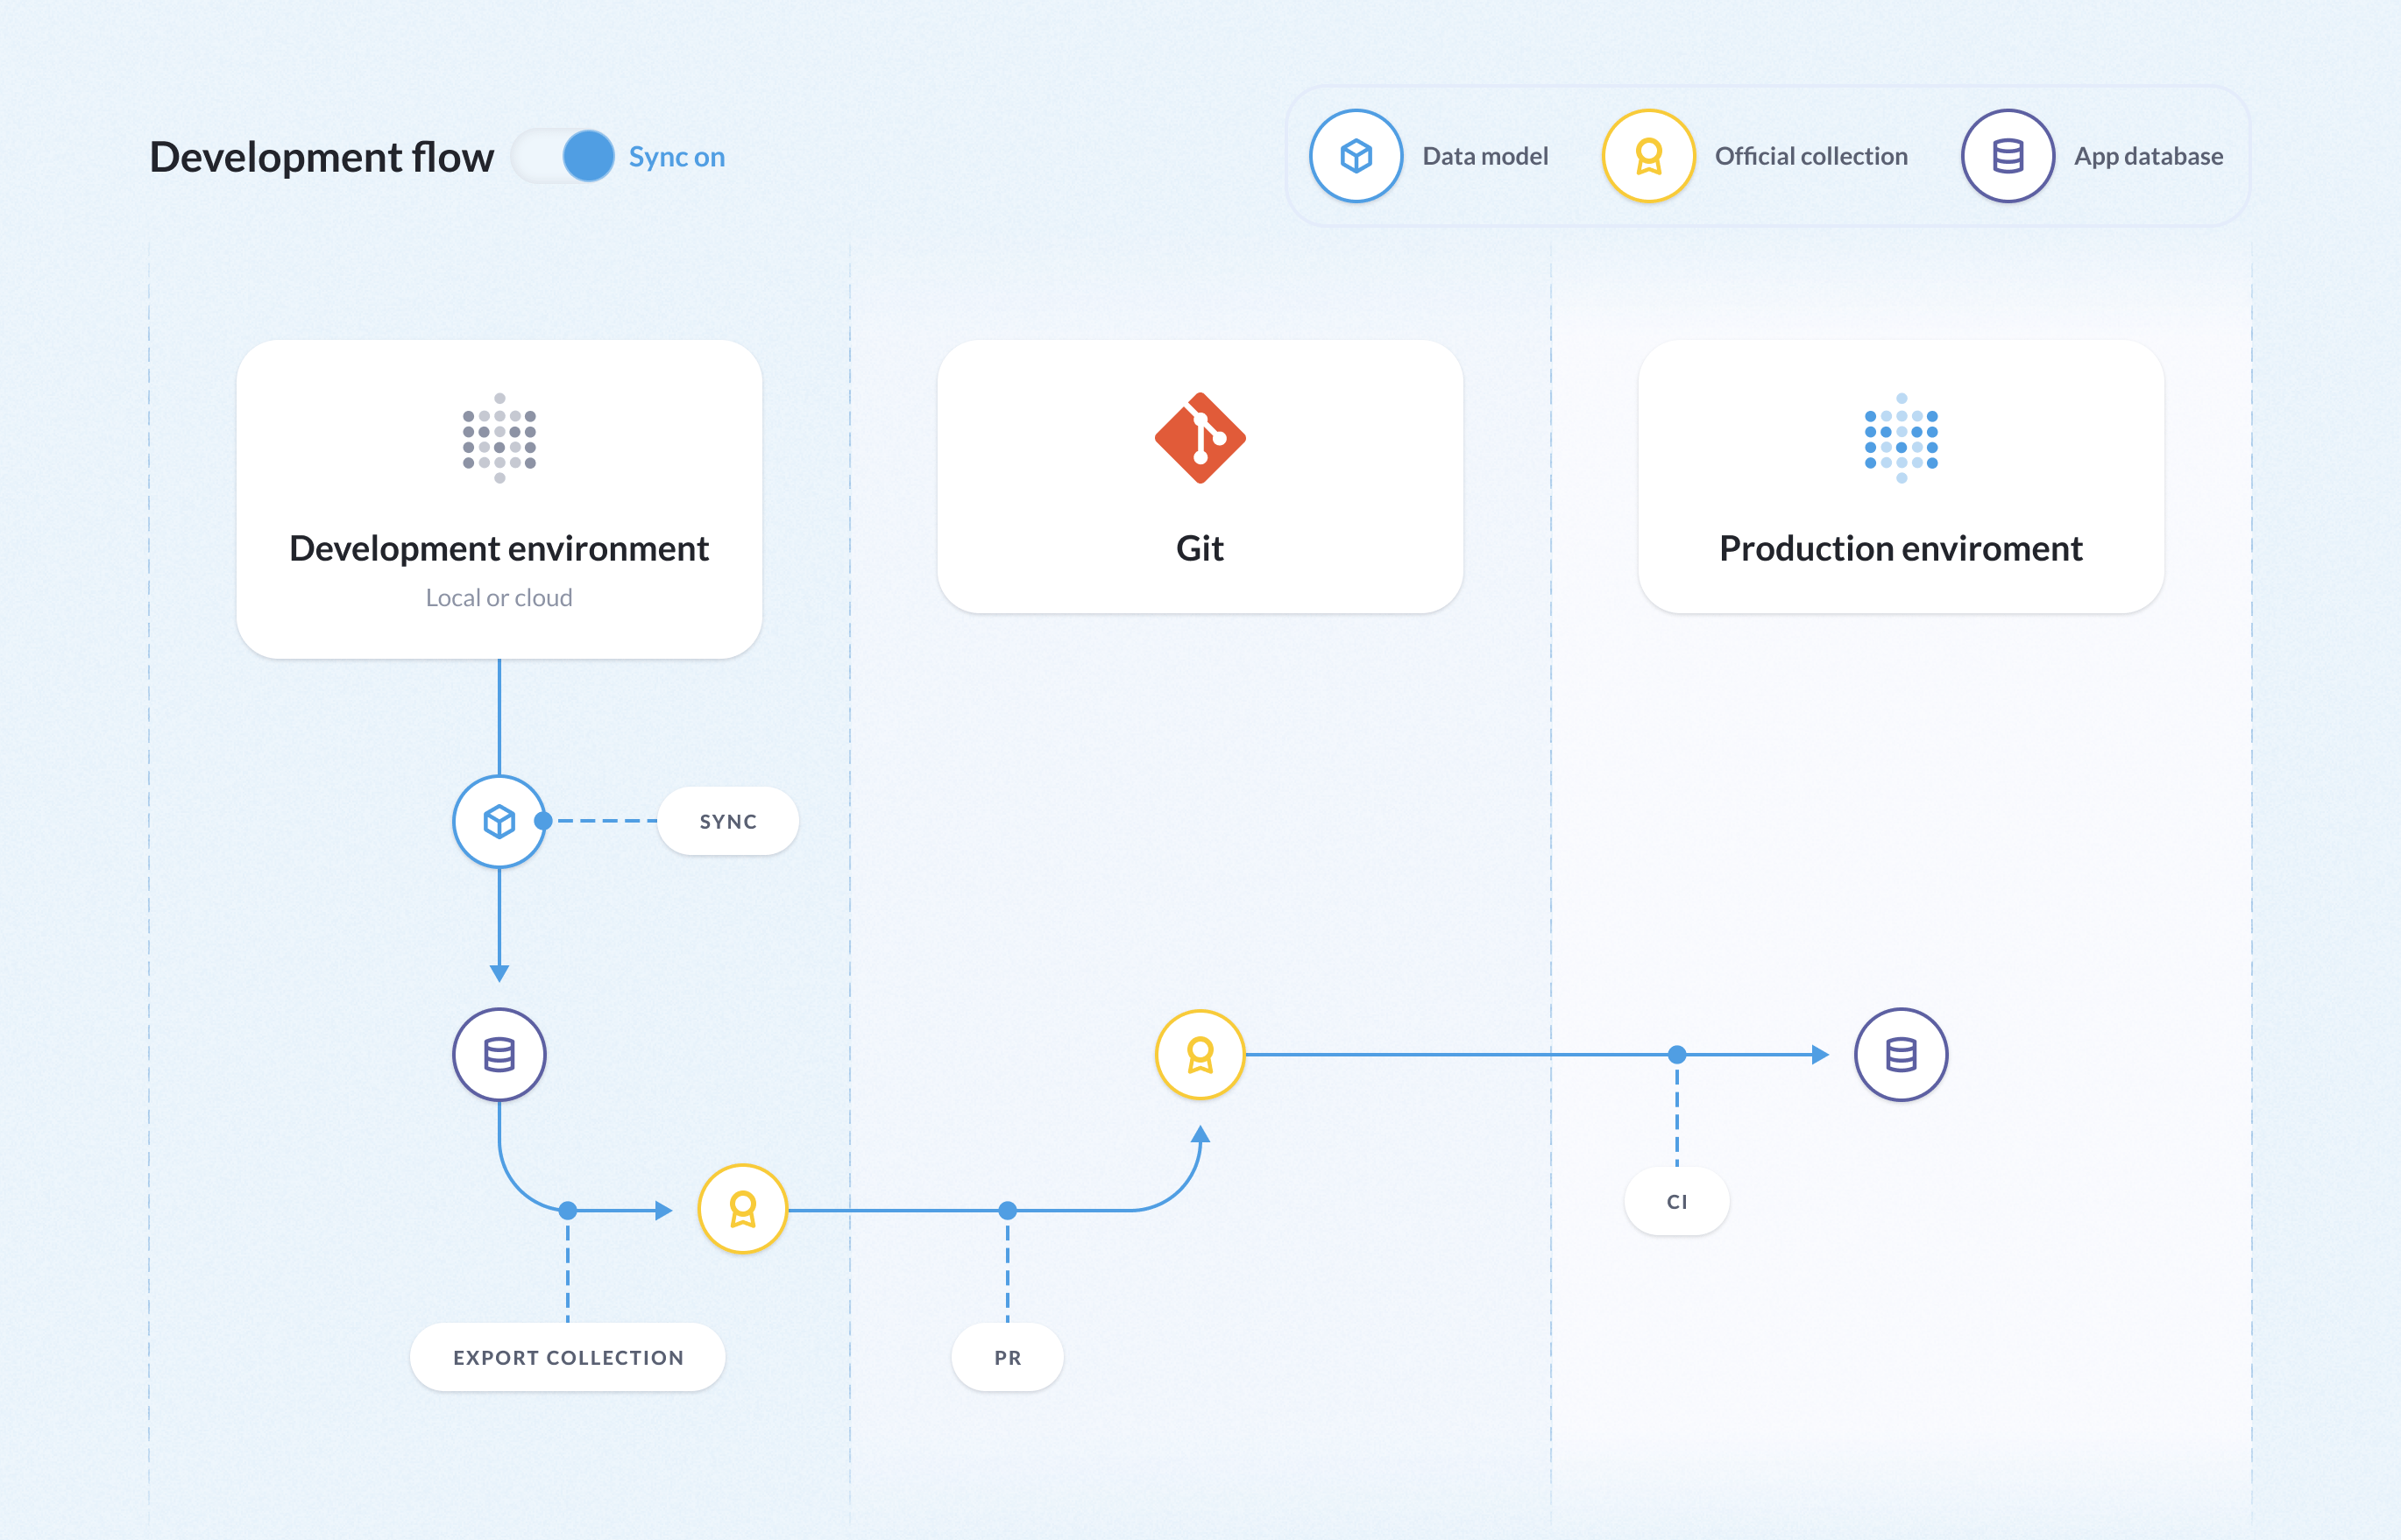
Metabase staging-to-production setup with sync ON
In this setup, the staging Metabase has sync on. This setup is unidirectional.
- Make changes in one staging Metabase.
- Export those changes in serialized format (YAML files).
- Commit those YAML files to a repository.
- Import those changes into your production Metabase.
Develop your content in your staging Metabase
Create your content: your models, questions, dashboards, collections, and so on in your staging Metabase.
Serialize the changes you made in your staging Metabase
Once you’re happy with your changes, you’ll serialize your changes so that you can commit them to your repository.
To serialize your changes, you’ll run Metabase’s export command.
For example, if you are only exporting collections 2, 3, and 4, you could run:
java -jar metabase.jar export repo_path --collection 2,3,4 --no-data-model --no-settings
By default, Metabase will exclude nested collections. To include nested collections, you’ll need to specify their IDs as well, just like for any top-level collection.
Metabase will serialize your staging Metabase with the changes you’ve made. You might also want to put this command in a bash script that you check into your repo, so you don’t need to type it out each time, and can tweak it as you develop.
Commit those changes to your working branch. Once you merge your working branch into your main branch, the GitHub workflow will run and import those changes into your production Metabase.
Create a GitHub Action Workflow YAML file
You can configure your repo so that when you merge your serialized changes into your main branch, the workflow will import those serialized changes into your production Metabase.
Here’s an example workflow with sync ON, or follow along here.
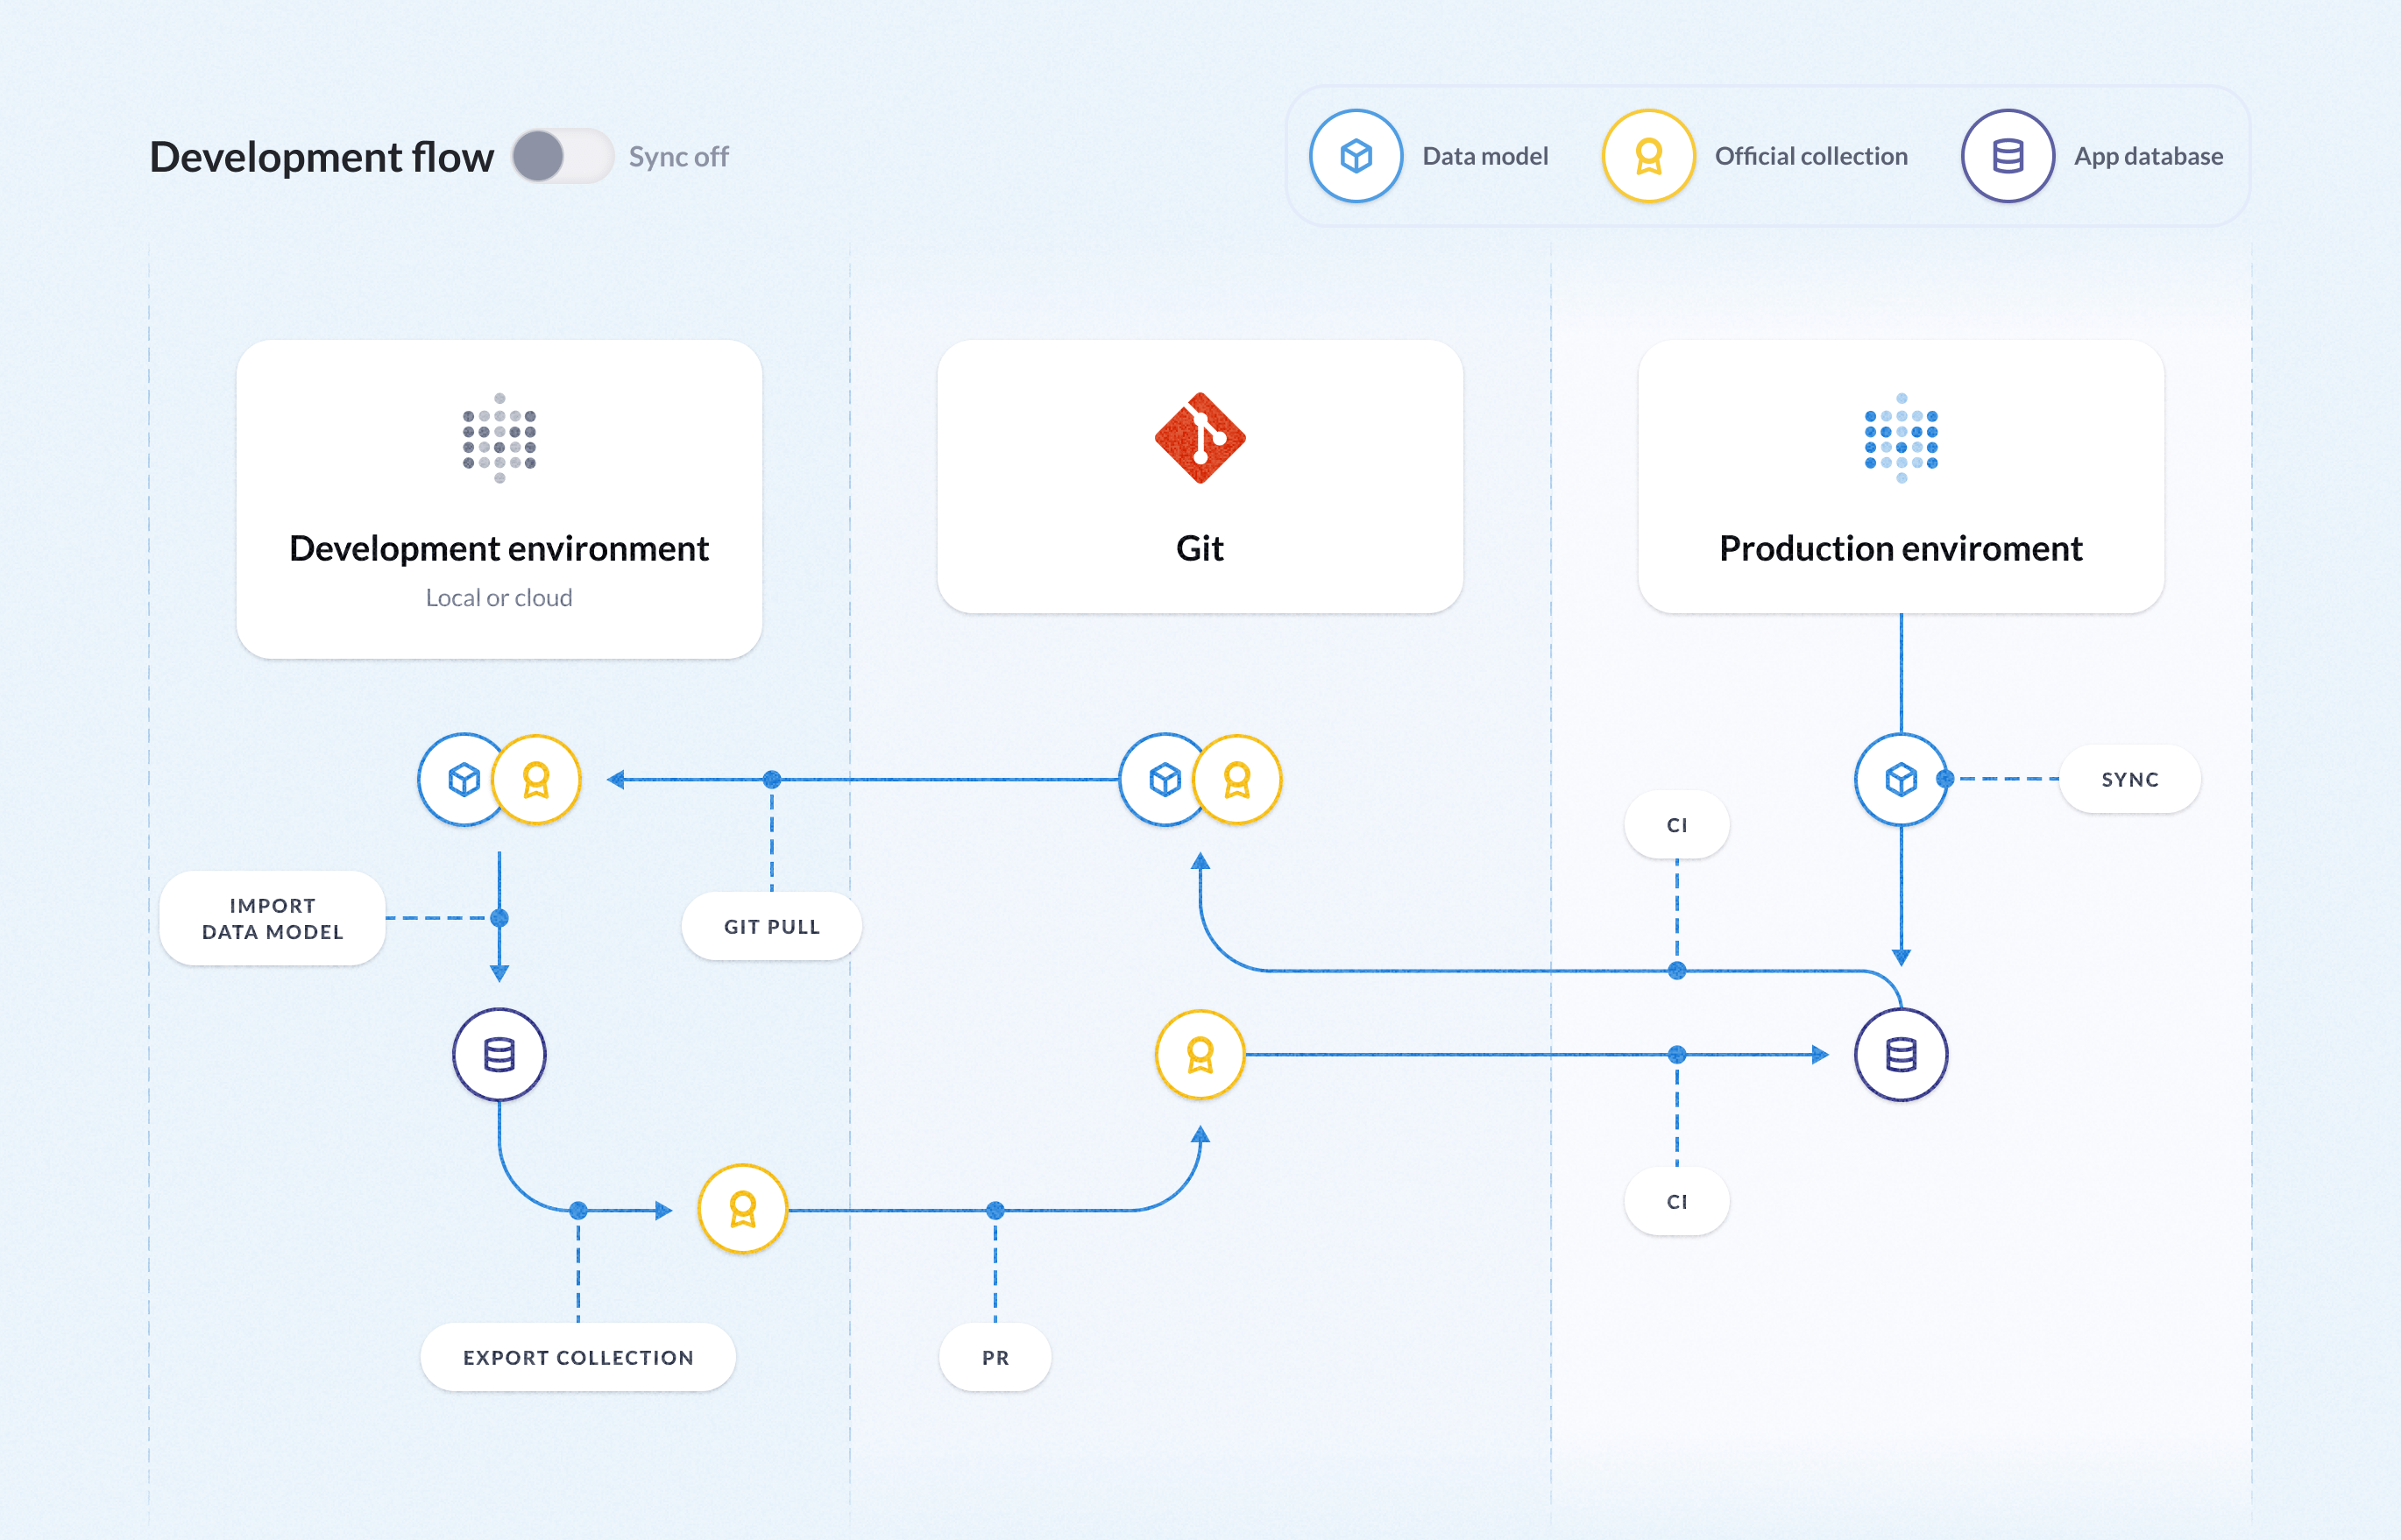
Metabase staging-to-production setup with sync OFF
In this setup, one or more staging Metabases have syncing turned off. This setup is bidirectional:
- Export your production data to update all of your staging Metabases.
- Commit those serialized YAML files changes to a repository.
- Import those changes into one or more staging Metabases.
- Develop new content in those staging Metabases: dashboards, models, etc.
- Export those changes from the staging Metabase(s) and commit the exported YAML files.
- Import that content into production.
- If you’re running multiple Metabases, you’ll need to update them with the new changes.
Make sure you’ve turned off sync
Disable the Metabase scheduler using the environment variable MB_DISABLE_SCHEDULER=true.
Disabling scheduling will turn off Metabase’s scheduled jobs, which include syncs, fingerprinting, and scanning, as well as dashboard subscriptions, alerts, and model caching.
Set up multiple staging environments with a config file
You only need one staging environment for this setup, but if you’d prefer to have multiple staging enviroments, you can use a config file to set up multiple staging Metabases.
Export the table metadata from your production Metabase
Since sync is off, you’ll need to get your table metadata from your production Metabase and import it into your staging Metabases.
The following command will export the collections you specify, as well as the table metadata.
java -jar metabase.jar export --collections COLLECTIONS_TO_SYNC --no-settings
If you want to export all collections from production Metabase, simply omit the --collections flag and its arguments.
We recommend setting up a workflow that exports this data automatically at a regular cadence.
Here’s an example workflow:
name: export-datamodel-from-prod
on:
  workflow_dispatch:
  # schedule:
  #  - cron: '0 */6 * * *' # Every six hours every day
env:
  MB_VERSION: 1.46.4
  COLLECTIONS_TO_SYNC: "2,3,4"
  MB_DB_TYPE: postgres
  MB_DB_DBNAME: metabase
  MB_DB_HOST: $
  MB_DB_USER: $
  MB_DB_PASS: $

jobs:
  export_data_model:
    runs-on: ubuntu-latest
    steps:
      - uses: actions/checkout@v3
      - name: Download selected version enterprise jar
        run: |
          curl -OL https://downloads.metabase.com/enterprise/v$MB_VERSION/metabase.jar
          stat ./metabase.jar
      - name: Export datamodel and curated collections
        run: |
          java -jar metabase.jar export $GITHUB_WORKSPACE --collections $COLLECTIONS_TO_SYNC --no-settings
      - name: Push Git commit
        run: |
          git config user.name github-actions
          git config user.email github-actions@github.com
          git add .
          if [[ $(git diff --cached --stat) != '' ]]; then
            git commit -m "Automatic export of the table metadata"
            git push
          fi
Import content from your production Metabase to your staging Metabase(s)
Since Metabase sync processes are off, you’ll need to pull content from production to “sync” your staging Metabases, including the table metadata. If you’re running multiple staging Metabases, you’ll need to update them each time there are any changes to the production table metadata, as well as any time you push changes from any one of your staging Metabases to your production Metabase.
Manually keeping your Metabases in sync is impractical, so we recommend creating and an action, like this action, that runs either every six hours, or daily, to keep your staging Metabases up to date with the changes in your production Metabase.
- Clone the repo where you exported your production data.
- Change into the directory that contains the Metabase jar for your staging Metabase.
-
Import the table metadata and curated collections by running:
java -jar metabase.jar import /PATH/TO/REPOWith
/PATH/TO/REPObeing the path where you stored your serialized data from your production Metabase. This command will load the updated table metadata, as well as any other changes to the repo. You need to run this command every time anyone updates your local repo.
Develop your content in your staging Metabase(s)
Log into your staging Metabase and create whatever content you want to push to production: models, questions, dashboards, and so on. Make sure to save these items in those Official collections that you marked for exporting to your production Metabase.
Export the changes you made in your staging Metabase to your production Metabase
For example, let’s say you want to export only collections 1,2,3.
java -jar metabase.jar export /PATH/TO/REPO --collection 1,2,3 --no-data-model --no-settings
Replace /PATH/TO/REPO with the path to your repo that contains your serialized Metabase data. And replace 1,2,3 with the ID numbers of the collections that you want to export, separating each collection ID with a comma.
The export command will serialize the changes you made in your development Metabase and save them to your repo.
Commit your changes to a branch and merge that branch into your main branch. The GitHub workflow that you set up will run and import those serialized changes into your production Metabase.