

Embedded analytics SDK - quickstart with sample app
Embedded analytics SDK is only available on Pro and Enterprise plans (both self-hosted and on Metabase Cloud). You can, however, play around with the SDK on your local machine without a license by using API keys to authenticate your embeds.
This guide sets up the embedded analytics SDK with a sample React app, but you can follow along with your own application.
Prerequisites
- Node.js 20.x LTS or higher (for the sample application).
- Metabase version v1.52 or higher.
- A Metabase Pro or Enterprise license (If you don’t have a license, check out this quickstart that lacks the paid JWT SSO setup.)
- (Optional): Docker
Two ways to set up the sample app with Metabase
- Quick setup with Docker (includes a sample Metabase)
- Walkthrough setup (bring your own Metabase, or spin up a new one)
Quick setup with Docker
This quick setup will run a Docker container with the sample app and a sample Metabase.
- Copy
.env.docker.exampleto.env.docker. - In the
.env.dockerfile, replace<your_enterprise_token>with your premium embedding token. - In the top-level directory, run:
yarn start
This script will:
- Pull a Metabase Docker image and run it in a container.
- Set up JWT SSO in Metabase.
- Build and run the sample application with an embedded interactive question.
The app will start on http://localhost:4400.
That’s it! You should be up and running.
If you want to log in to the sample Metabase this command set up, visit http://localhost:4300. You can log in with email and password as Rene Descartes:
- email: rene@example.com
- password: foobarbaz
Walkthrough setup
We’re going to do some setup in Metabase, and then in the sample application. You can also bring your own Metabase, in which case you can skip the installation step.
Here’s a quick overview of what you’ll be doing:
Set up Metabase for embedding
- Install Metabase Enterprise Edition (if you haven’t already)
- Activate your license
- Enable embedding
- Enable SSO with JWT
Start up the sample application
- Get the sample application.
- Set up the application environment.
- Run the app server to handle authentication with JWT and serve the embedded Metabase components.
- Run the client application that will contain Metabase components built with the SDK.
And then fiddle around with styling.
Let’s go.
Install Metabase Enterprise Edition
You can run Metabase Pro on a Cloud plan with a free trial.
Or run it locally. Here’s a docker one-liner:
docker run -d -p 3000:3000 --name metabase metabase/metabase-enterprise:latest
You can also download the JAR, and run it like so:
java --add-opens java.base/java.nio=ALL-UNNAMED -jar metabase.jar
By default, Metabase will run at http://localhost:3000.
If you get stuck, check out our installation docs.
Activate your license
To enable SSO with JWT when self-hosting, you’ll need to activate your license. Metabase Pro plans on Cloud take care of this for you.
Enable embedding in Metabase
From any Metabase page, click on the gear icon in the upper right and select Admin Settings > Settings > Embedding.
Turn on:
- Embedded analytics SDK
- Static embedding
Otherwise, this whole thing is hopeless.
Enable SSO with JWT
We’ll also need to update our JWT Provider URI in Metabase. By default, this URI is where the SDK will redirect login requests.
From any Metabase page, click on the gear icon in the upper right and select Admin Settings > Settings > Authentication.
On the card that says JWT, click the Setup button.
JWT Identity provider URI
In JWT IDENTITY PROVIDER URI field, paste
http://localhost:9090/sso/metabase
Or substitute your Cloud URL for http://localhost.
String used by the JWT signing key
Click the Generate key button.
Copy the key and paste it in your .env file into the env var METABASE_JWT_SHARED_SECRET.
The application server will use this key to sign tokens so Metabase knows the application’s requests for content are authorized.
Save and enable JWT
Be sure to hit the Save and enable button, or all is void.
Set up the sample application
Clone the Metabase Node JS React SDK embedding sample app.
git clone git@github.com:metabase/metabase-nodejs-react-sdk-embedding-sample.git
Check out the branch that corresponds to your Metabase version
Check out the branch in the metabase-nodejs-react-sdk-embedding-sample repo that corresponds to your Metabase version.
E.g., if you’re running Metabase 1.53, make sure the sample app repo is on the 53-stable branch. You can find your Metabase version in the Metabase UI by clicking on the gears icon in the upper right and selecting About Metabase.
To switch to another branch, run git checkout <branch-name>, e.g.:
git checkout 52-stable
Set up the application environment
In the sample app’s main directory, copy the .env.example template to .env.
cp .env.example .env
In .env, make sure VITE_METABASE_INSTANCE_URL and METABASE_INSTANCE_URL point to your Metabase instance URL, e.g., http://localhost:3000.
Your .env will look something like:
# FRONTEND
CLIENT_PORT=3100
VITE_METABASE_INSTANCE_URL="http://localhost:3000"

# BACKEND
AUTH_PROVIDER_PORT=9090
METABASE_INSTANCE_URL="http://localhost:3000"
METABASE_JWT_SHARED_SECRET="TODO"
Set up the application server
Change into the server directory:
cd server
Install packages:
npm install
Start the server:
npm start
Set up the client application
In a different terminal, change into the client directory:
cd client
Install dependencies:
npm install
This command will install the Metabase embedded analytics SDK, in addition to the application’s other dependencies.
You can also install a different version of the SDK. Just make sure that the major version of the SDK matches the major version of the Metabase you’re using.
Start the client app:
npm start
Your browser should automatically open the app. By default, the app runs on http://localhost:3100.
At this point, you should be up and running
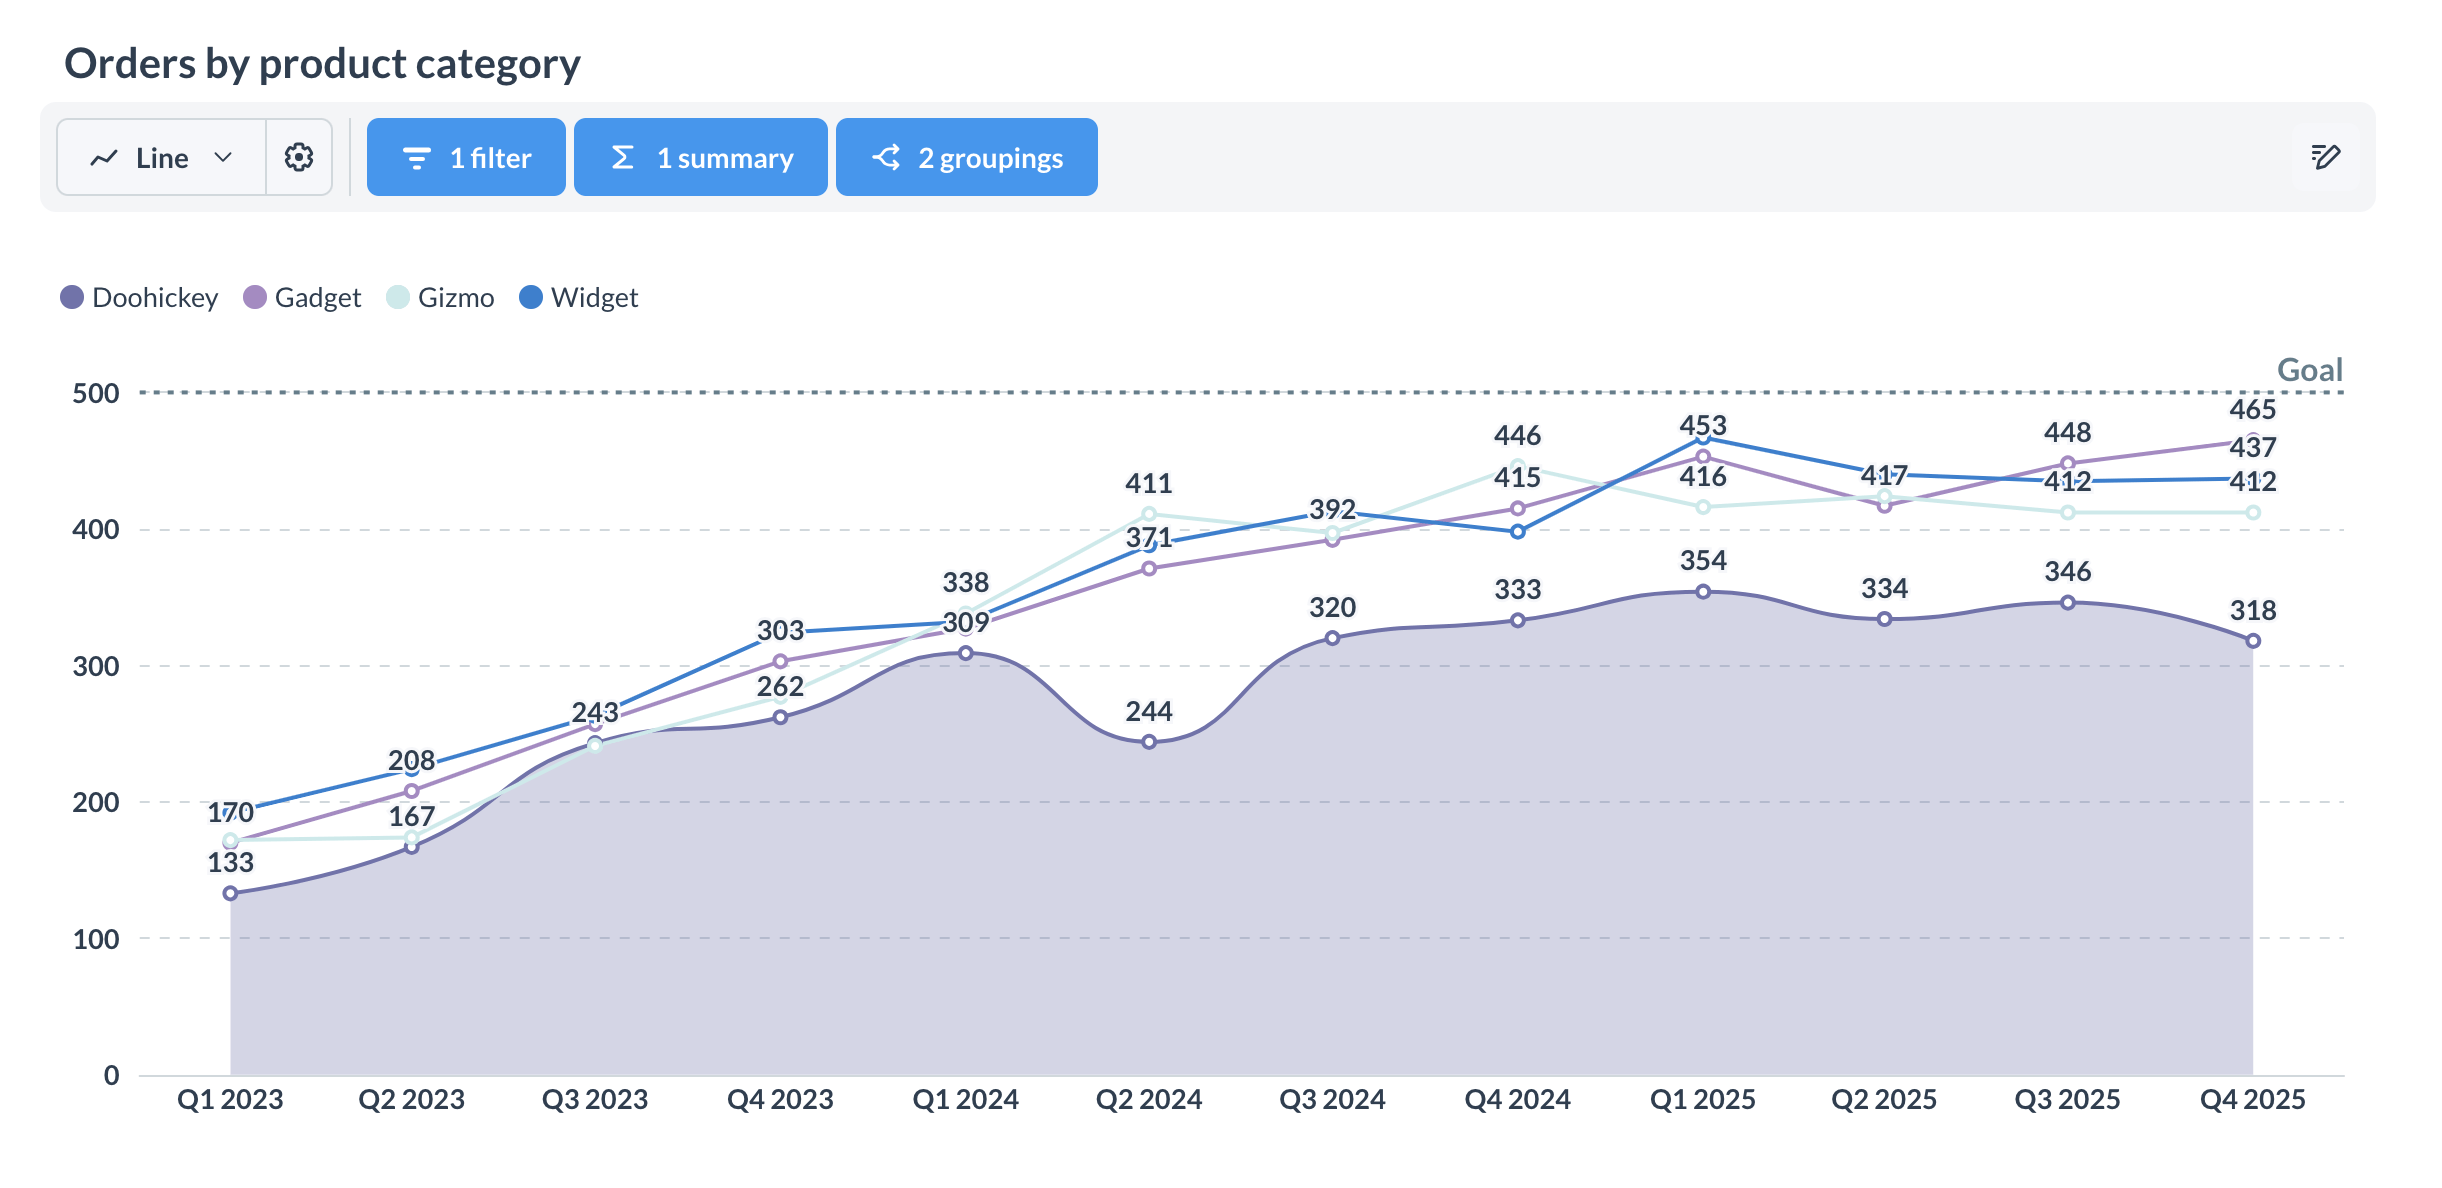
In your app, you’ll see an embedded InteractiveQuestion component.
<MetabaseProvider authConfig={authConfig} theme={theme}>
  <InteractiveQuestion questionId={questionId} />
</MetabaseProvider>
Next steps
To style the components, try changing some of the theme options in the client app at client/src/App.jsx. For more on theming, check out Appearance.
Read docs for other versions of Metabase.